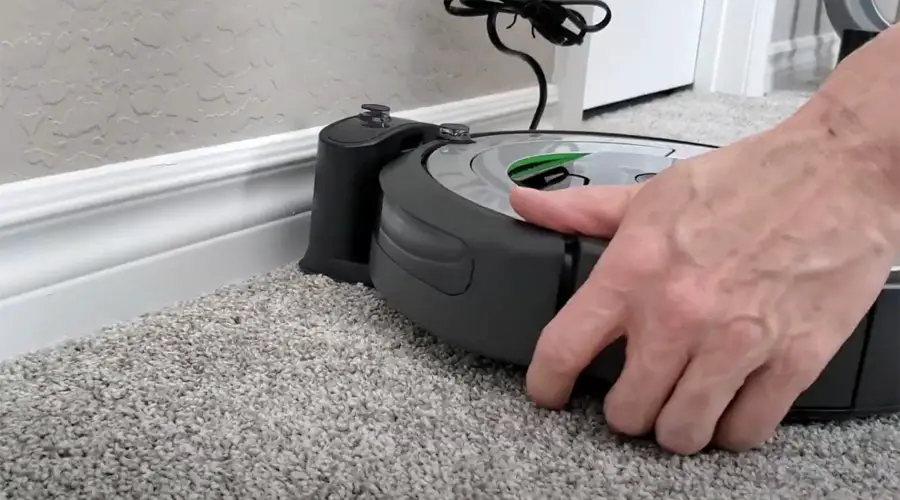
Roomba Vacuum Cleaner is great in all of its aspects but just because it is an electrical equipment, issues and errors can occur. As soon as you encounter an error, it may feel quite annoying but if you know the solutions to replace the issues, you will be quite relieved. As soon as an error occurs, a tune will come out along with a voice such as “Error 1”, “Charging Error 3”, etc.
The troubleshooting light on the Roomba Vacuum Cleaner will also blink. To make things easy for you, we have gathered error codes along with their solutions. The errors and their solutions are classified according to Roomba Vacuum Cleaner’s different series and whether it is on charging or not.
Roomba vacuum cleaner 900 series error codes
Roomba vacuum cleaner Error one (1)
Cause:
This error occurs if either the left or right wheel of the Roomba vacuum cleaner is hanging out of the robot’s body.
Solution:
- The error can be resolved by changing the location of the robot and placing it on an even surface. Press CLEAN in the end to restart the cleaning cycle.
Roomba vacuum cleaner Error two (2)
Cause:
This error occurs when the dust or waste extractors of the Roomba are not turning. This can happen due to extreme debris and dirt build-up in and around the extractors.
Solution:
There is only one solution to this error:
- Remove the debris and dirt stuck in or around the Roomba extractors. You may open the cage for better cleaning.
Roomba vacuum cleaner Error five (5)
Cause:
This error is reported by Roomba when one of the side wheels of the robot is stuck mostly because of dirt around the bearings or something wrapped around it.
Solution:
The error can be resolved by the following method.
- Clean the side wheels of Roomba while making sure that they move in and out without any resistance. Spin them in both ways to remove each last residue of stuck dirt.
Roomba vacuum cleaner Error six (6)
Cause:
This error can be reported by Roomba due to three reasons.
- There is dust covering the visibility of cliff sensors.
- The robot has reached a location where it is hanging over a cliff-like area or a drop such as stairs.
Solution:
The issue can be resolved in two ways.
- Change the location of the robot with enough light and even surface.
- Wipe off the dust from the cliff sensors using a clean cloth or tissue paper.
Roomba vacuum cleaner Error eight (8)
Cause:
This error is reported due to two reasons.
- The vacuum fan of the robot is stuck mainly because of debris build-up.
- The filters of the vacuum are jammed or clogged because of dirt and waste material.
Solution:
The issue can be resolved by a simple process.
- Take the vacuum bin or dustbin out of the robot. Empty it while cleaning the filters as well. Put the dustbin back in its intended position.
Roomba vacuum cleaner Error nine (9)
Cause:
This error occurs due to two reasons.
- The front bumper is jammed or stuck because of dust and debris build-up.
- The sensors on the front bumper are covered with dust.
Solution:
- Gently tap the front bumper several times until the debris stops coming out and the bumper begins to move in and out freely.
- Wipe off the dust from sensors using a clean cloth.
Roomba vacuum cleaner Error ten (10)
Cause:
This thing happens if one of the side wheels of the Roomba is stuck due to debris, string, or hair wrapped around.
Solution:
- Remove dirt and debris from the side wheels and ensure that nothing is wrapped around the wheel (mostly from inside) such as a string or hair. Spin wheels in both directions.
Roomba vacuum cleaner Error eleven (11)
Cause:
This error occurs due to any internal issue mostly if the dust bin is disconnected from the robot.
Solution:
The error can be taken down in two ways.
- Take the vacuum bin out and insert it again in its intended position.
- Open the mobile application for help.
Roomba vacuum cleaner Error fourteen (14)
Cause:
This error is reported if the dustbin is not attached properly to the Roomba vacuum cleaner.
Solution:
The error can be shut down by a simple process.
- Take the dustbin out, reinstall it into the robot’s body, press CLEAN and restart the cleaning process.
Roomba vacuum cleaner Error fifteen (15)
Cause:
This error occurs when Roomba is facing any kind of internal issues which are mostly related to hardware.
Solution:
- Just press CLEAN on the Roomba vacuum cleaner and restart the cleaning process.
Roomba vacuum cleaner Error sixteen (16)
Cause:
This error occurs when a Roomba vacuum cleaner has started its cleaning path while it was moving or tilted at some angle. This can also happen if the robot bumped intensively while moving.
Solution:
This error can be resolved by simple steps.
- Change the location of the robot and place it on an even and leveled surface.
- Make sure that the robot is flat on the ground when you start the cleaning process.
Roomba vacuum cleaner Error seventeen (17)
Cause:
The sole reason for this error is an incomplete cleaning job by the Roomba vacuum cleaner. It will report this error if the robot is unable to clean the whole area mostly because of something blocking its path.
Solution:
The only solution to this error is below:
- Ensure that the robot has a clear area to complete its cleaning job. The doors should be opened and there should be no obstacle in cleaning the path that robots cannot move around.
Roomba vacuum cleaner Error eighteen (18)
Cause:
This error occurs when Roomba is trying to get back to its initial starting point or Home Base but isn’t able to do so because of any reasons.
Solution:
This issue can be resolved by:
- Making sure that you have a proper Home Base setup for your Roomba vacuum cleaner and that the robot will fit perfectly in the setup.
Roomba vacuum cleaner Error nineteen (19)
Cause:
This error is a clear indication of a single error that the cliff sensors are activated as they reach the docking area.
Solution:
This error can only be resolved by:
- Making sure that the environment of the docking area of Roomba is perfect and best suitable for the robot.
Roomba vacuum cleaner 800 series error codes
Roomba vacuum cleaner Error 1
Cause:
This error occurs if the Roomba vacuum cleaner is stuck mainly because of the drive wheel hanging out or something stuck in the wheels.
Solution:
Many things can be done to resolve these issues.
- Verify that all wheels of the Roomba vacuum cleaner are touching the ground properly.
- Clean the wheels by removing dust, debris, waste material, or hair stuck in them. Push the wheel in until spring pushes it out. Run wheels back and forth until they run smoothly and freely.
- Pick up your Roomba vacuum cleaner and place it in a new location that is an even and clear surface. Press CLEAN and then restarts the cleaner to start its process again.
Roomba vacuum cleaner Error 2
Cause:
This error is caused due to issues like:
- The extractors and caps of the cleaner are not turning properly, mainly because of dust, debris, waste material, or stuck hair.
- Drive wheels are unable to move back and forth.
Solution:
- Open the covers and remove dust and debris from the Roomba extractors and caps. Cean the extractor frame as there could also be dust build-up in it.
- Remove debris and hair from the drive wheels of the vacuum cleaner.
Roomba vacuum cleaner Error 5
Cause:
This error is displayed by the Roomba vacuum cleaner as the side wheels are stuck due to debris, dust, hair, or any other reason.
Solution:
There are a couple of things you can do to get rid of this error.
- Remove all the dust, debris, and hair from the side wheels. Push them in and out while rotating them both ways. Make sure that wheels move freely both ways after removing debris.
- Place the vacuum cleaner on a new place with an even surface to start its working.
Roomba vacuum cleaner Error 6
Cause:
There are three possible causes of Roomba vacuum cleaners reporting this error.
- The cliff sensors of the Roomba cleaner are dirty because of dust build-up.
- The vacuum cleaner is hanging on a steep area or a drop where there is no way for it to move forward.
- The vacuum cleaner is stuck in an extremely dark area where detecting the path is impossible for the sensors.
Solution:
Although there are multiple causes, the solution is the same for most.
- Firstly, try changing the location of the Roomba vacuum cleaner as it will remove this error in most cases.
- If the error still exists, wipe off the dirt from the cliff sensors using a soft and clean cloth or tissue.
Roomba vacuum cleaner Error 7
Cause:
This error occurs when the side wheel of the vacuum cleaner is stuck or not moving mostly because of debris or something wrapped around the wheel.
Solution:
There are a few tricks that you can apply to get rid of this error.
- Push the side wheel inside until the spring pushes it back towards you.
- Rotate the side wheel in both directions until it starts moving freely.
- Clean side wheels by removing dust, debris, waste material, hair, or any other thing that is stuck on the side wheels.
Roomba vacuum cleaner Error 8
Cause:
This error is displayed if the fan of the Roomba vacuum cleaner is not working or the dustbin is filled to the extent that the cleaner is now unable to carry on the cleaning process.
Solution:
Two solutions can be implemented to resolve this error on your Roomba Vacuum Cleaner.
- Clean the fan by removing dust and debris.
- Take out the dustbin from the vacuum cleaner, empty it, and put it back in its intended opposition properly. Make sure that no waste residues are still inside the dustbin after cleaning.
Roomba vacuum cleaner Error 9
Cause:
If this error is being reported by the Roomba Vacuum Cleaner, the front bumper is at fault. The front bumper may have debris to the extent that it is jammed or the bumper sensors are dirty and cannot operate efficiently.
Solution:
Two things can be done to resolve this error and let the vacuum cleaner carry on its normal working.
- Gently tap on the front bumper several times to remove the dust and debris stuck inside and causing the jam.
- Clean the front bumper sensors by moving a clean and soft cloth with a gentle touch.
Roomba vacuum cleaner Error 10
Cause:
Three potential reasons can cause Roomba Vacuum Cleaner to report this error.
- The side wheel of the vacuum cleaner is stuck or hanging out.
- The front bumper sensors are unable to detect the obstacles mostly because of dust build-up or something blocking the sensors.
- The cleaner is in a very large hall.
Solution:
Just like the causes, there are three solutions to the problem as well.
- Remove dust, debris, or hair from the side wheels while making sure that they are moving in-out and running back and forth freely.
- Clean the front bumper sensors if there is dust buildup or remove the object which is blocking its vision.
- Place something to make a small virtual wall so that the cleaner can assume the cleaning area is small and starts cleaning again.
Roomba vacuum cleaner 800 series charging error codes
Roomba vacuum cleaner 1 BLINK, Err 1
Cause:
This error is reported by the Roomba vacuum cleaner when the battery is not connected to the cleaner when you plug it into the charger.
Solution:
Remove the Roomba battery covers located right under the machine. Pull the battery out of the Roomba cleaner and then reinstall it into the robot. Wait for a few seconds and plug in the charger again.
Roomba vacuum cleaner 2 BLINKS, Err 2
Cause:
This charging error can occur if Roomba is too hot and needs to be cooled down before charging.
Solution:
This error can easily be resolved by letting the Roomba Vacuum Cleaner rest for about an hour and once it cools down properly, plug the charger back in and start charging.
Roomba vacuum cleaner 3 BLINKS, Err 3
Cause:
These charging errors can occur due to any charging-related technical issues.
Solution:
For this error, the manufacturer recommends contacting the company’s customer support services.
Roomba vacuum cleaner 5 BLINKS, Err 5
Cause:
This error occurs if there is some fault in the Home Base of Roomba Vacuum Cleaner. The physical cause be a wrong installed Roomba Home Base or dust build-up on it.
Solution:
There are two ways to resolve this error:
- Make sure that the Roomba Vacuum Cleaner’s Home Base is perfectly installed in its intended position.
- Remove the dust and debris build-up from the points that are connecting the Roomba vacuum cleaner to its home base.
Roomba vacuum cleaner 6 BLINKS, Err 6
Cause:
This error is reported by the Roomba vacuum cleaner if the battery is too warm while you are trying to charge it.
Solution:
Just let the vacuum cleaner stay still for about 60 minutes as this time will be enough to cool down the Roomba battery. After an hour has passed, put the cleaner back on charging again.
Roomba vacuum cleaner 7 BLINKS, Err 7
Cause:
The occurrence is reported by the Roomba if the battery is staying hot for a long time and not cooling down.
Solution:
The solution will be simple:
- You just need to turn OFF the Roomba vacuum cleaner until its battery and the whole system are cooled down completely.
Roomba vacuum cleaner 700 series error codes
Roomba vacuum cleaner 1 BEEP error after “uh-oh” sound
Cause:
If the dustbin in the vacuum cleaner is not installed correctly, this error will be reported by the robot.
Solution:
- Remove the dust bin from the vacuum cleaner and reinsert it while making sure that it is perfectly placed in its intended position.
Roomba vacuum cleaner No Voice Error after “uh-oh” sound
Cause:
If you hear the sound “uh-oh” followed by no voice or error, this is a clear indication that the dustbin is not fully connected with the Roomba vacuum cleaner.
Solution:
The issue can be resolved by simple steps.
- Take the dustbin out of the cleaner, empty it, and reinsert it in its intended position. Make sure it fits perfectly. Press CLEAN and restart the cleaning cycle.
Roomba vacuum cleaner Error one (1) after the “uh-oh” sound
Cause:
This error can occur due to two reasons.
- One of the wheels of the Roomba vacuum cleaner is stuck or hanging out of the robot body.
- The robot itself is stuck in some obstacle or uneven surface.
Solution:
This error can be resolved in any of the two following ways.
- Clean the robot’s wheel while removing the dust, debris, dirt, and any other things stuck in them.
- Pick up the robot and place it on a new location that has an even surface and aren’t many obstacles that the robot can drive over.
Roomba vacuum cleaner Error two (2) after the “uh-oh” sound
Cause:
This error is reported by the vacuum cleaner when its main brushes or the dust extractors are stuck or something is stuck in them.
Solution:
The error can be resolved by a single method.
- Open the casing or cage over the main brushes and remove the dust and debris from them. Move them in and out to see if they are moving smoothly. Put back the cage in its place after cleaning is done.
Roomba vacuum cleaner Error five (5) after the “uh-oh” sound
Cause:
Whenever your Roomba vacuum cleaner report Error five (5), just know that one of the side wheels of the robot is stuck mostly because of dust or hair stuck in it.
Solution:
There is only one solution to this problem.
- Thoroughly clean the side wheels of the robot to remove dirt or something stuck in it. Spin the wheel in both directions until it moves freely without any resistance.
Roomba vacuum cleaner Error six (6) after the “uh-oh” sound
Cause:
This error occurs due to three interconnected reasons.
- The robot is stuck over a cliff where it cannot move back or forth.
- The robot is stuck in a place that is dark enough that the path cannot be detected.
- The cliff sensors of the vacuum cleaner are facing some issues due to dust build-up.
Solution:
You can get rid of this error by following a different method for each specific cause of the issue.
- Clean cliff sensors using a soft cloth or tissue paper. Be gentle and remove all the dust covering up the sensors.
- Pick up the robot and place it in a new location with enough light and an even surface.
Roomba vacuum cleaner Error seven (7) after the “uh-oh” sound
Cause:
This error occurs when one of the side wheels of the vacuum cleaner is not spinning properly or at all.
Solution:
The solution is to keep on spinning the wheels with your hand until you feel that they are spinning freely and there is no resistance at all. Look at the inner side of the wheel to remove stuck strings or hair, if there are any.
Roomba vacuum cleaner Error nine (9) after the “uh-oh” sound
Cause:
This error is directly connected to the front bumper and can be caused due to two reasons.
- The front bumper of the vacuum cleaner is jammed or compressed due to dust build-up.
- The front bumper sensors are dirty and not working efficiently.
Solution:
This error can easily be resolved by simple procedures.
- Gently tap the front bumper from the outside to remove the dirt build-up. Do this until no dust is coming out of the bumper and it is moving in and out smoothly.
- Clean the dust from the bumper sensors to ensure good visibility of the obstacles.
Roomba vacuum cleaner Error ten (10) after the “uh-oh” sound
Cause:
There are two potential causes of Roomba causing this error.
- One of the side wheels of the robot is stuck in some place because of dirt and dust build-up, especially in the bearings.
- Roomba is unable to register obstacles which makes it assume that it is a large cleaning area.
Solution:
The issue can be resolved by the following methods.
- Remove dust and dirt from the side wheels while spinning them to the extent that they start moving freely.
- Add some virtual walls or re-arrange the obstacles in the large cleaning room so that Roomba can register obstacles time after time.
Roomba vacuum cleaner Error one four (1-4) after the “uh-oh” sound
Cause:
As soon as you hear Error (1-4), you should be sure that Roomba is missing its dustbin. This can happen if the dust bin is full or not attached properly to the robot.
Solution:
This error can be resolved in a simple step.
- Take the dustbin out of the Roomba and reinsert it in its intended position. Make sure that the dustbin is empty of any debris. Press CLEAN and restart the cleaning cycle in the end.
Roomba vacuum cleaner Please Charge Roomba error after the “uh-oh” sound
Cause:
The message is a clear description of this error.
- The battery is not connected with the Roomba vacuum cleaner or it is critically low.
Solution:
There is only one way to resolve this error.
- Reinsert the battery while making sure that the pull tabs are removed.
- Place the robot on a charging dock or plug in the charging cord directly into the Roomba vacuum cleaner.
Roomba vacuum cleaner 600 series error codes
Roomba vacuum cleaner Error one (1)
Cause:
This error is a clear indication of two problems.
- One or some of the side wheels are hanging out or stuck mostly because of dust build-up of something wrapped around it.
- The Roomba vacuum cleaner is stuck due to uneven surfaces, some obstacles, or any other reason.
Solution:
There are two possible solutions to this problem. You should try first and if you get no response, then move on to second one.
- Pick up the Roomba vacuum cleaner and then place it in a new location where there is an even surface and there aren’t any obstacles that Roomba can drive over.
- Clean the side wheels to remove dirt, dust, and debris. Look for something wrapped around such as a string or hair.
Roomba vacuum cleaner Error two (2)
Cause:
This error occurs when the main brushes of the Roomba vacuum cleaner are not turning. This can happen due to technical reasons but dust build-up or something stuck in the brushes are major reasons.
Solution:
There are two ways to resolve this error.
- Open the cage and covers of the main brushes and remove if anything is stuck in them. Try moving the brushes in and out to see if they are moving freely. Put the covers and cage back at the end.
- Change the location of the robot to an even surface.
Roomba vacuum cleaner Error five (5)
Cause:
This error is reported by Roomba when any of the side wheels are stuck mainly because of dust and dirt build-up.
Solution:
The only solution to this problem is:
- Remove dust and debris from the side wheels. Push them in and out. Rotate the wheels in both directions to see if they are moving freely. Remove wheels and clean bearings especially if something is stuck or wrapped around it.
Roomba vacuum cleaner Error six (6)
Cause:
Three reasons can become a cause of this error on Roomba vacuum cleaners.
- The cliff sensors of robots have a dust build-up which is affecting their visibility and detection abilities.
- Roomba vacuum cleaners are stuck or hanging over a cliff mostly because of uneven surfaces.
- The vacuum cleaner is stuck in a very dark place where it is unable to detect further location.
Solution:
Multiple things can be done to get rid of this error on your robot cleaner.
- Wipe off the dust from the cliff sensors which are blocking its vision. You may use a clean cloth or tissue paper as well.
- Pick up the vacuum cleaner and place it in a new location with enough light, even surface, and clear cleaning area.
Roomba vacuum cleaner Error seven (7)
Cause:
This error is a cleaner indication of single issues that one of the side wheels of the vacuum cleaner is stuck mainly because of dirt build-up or something wrapped around it.
Solution:
This error can be resolved only in one way, cleaning.
- Remove dirt build-up from the side wheels. Push side wheels in and out and spin them back and forth to ensure they are moving freely. Take rid of something wrapped around the wheels.
Roomba vacuum cleaner Error nine (9)
Cause:
This error is reported by the vacuum cleaner due to two reasons.
- The front bumper of the robot is jammed or compressed due to extreme dust build-up.
- The front bumper sensors are dirty and unable to perform their functionalities.
Solution:
This error can easily be resolved by two simple solutions:
- Tap the front bumper to remove the dirt from it. Move the front bumper in and out until the dirt stops coming out and the bumper is moving freely.
- Wipe off the dust from the bumper sensors using a clean cloth or tissue paper. Move the cloth gently so that you don’t affect the sensors.
Roomba vacuum cleaner Error ten (10)
Cause:
This error is reported by the vacuum cleaner due to two reasons.
- One of the side wheels of the robot is stuck mainly because of dirt buildup or something wrapped around its bearings.
- The front bumper is not reporting an obstacle in the room mainly because of the large cleaning area.
Solution:
The error can easily be resolved by two simple solutions.
- Clean the dirt and remove string or hair wrapped around the side wheels. Push them in and out and rotate them in both directions until they start moving freely.
- Place the robot in a small cleaning room or add some virtual wall in the room so that the Roomba vacuum cleaner can assume it as a small cleaning area.
Roomba vacuum cleaner Error one four (1-4)
Cause:
This error occurs if the Roomba vacuum clenaer’s dustbin is displaced from its intended position. The robot gives this voice error when it is unable to detect a dust bin.
Solution:
The simple solution to this problem is to:
- Take out the robot dustbin, empty it, and reinsert it in its intended position. Make sure that the dustbin is perfectly inserted and then press CLEAN to restart the robot’s cleaning cycle.
Roomba vacuum cleaner Error one eight (1-8)
Cause:
This error occurs when Roomba is unable to detect or get back to its starting point or Home Base.
Solution:
Try changing the location of the vacuum cleaner or make sure that Home Base and Charging aspects are in place. You may place the robot manually in the Home Base to see if it starts charging.
Roomba vacuum cleaner 4 tone song, Please Charge Roomba error
Cause:
This error is solely what is said by the Roomba vacuum cleaner. This happens when the battery is not attached to the vacuum cleaner or needs to be charged.
Solution:
The following steps will help you get rid of this error.
- Remove the battery and re-insert it into its intended position. Make sure that pull tabs are removed.
- Place the robot in Home Base for charging or plug in the direct charging cord to your Roomba vacuum cleaner.
Roomba vacuum cleaner No voice error after the “uh-oh” sound
Cause:
This error is reported mainly because of two reasons.
- The robot is not detecting or registering an obstacle in the whole cleaning area.
- The vacuum cleaner is stuck in some place due to an uneven surface or an obstacle.
Solution:
Two things can be done to get rid of this error.
- Add a wall in a large cleaning area where the robot can detect obstacles and assume it as a small place. You may also recharge the obstacles in a way that robots can register them time after time.
- Place the vacuum cleaner in a new location with an even and clear surface.
Roomba vacuum cleaner 500 series error codes
Roomba vacuum cleaner 1 BEEP, ERROR 1
Cause:
There are two possible causes of this error:
- One or any of the Roomba vacuum cleaner wheels are hanging out of the machine or stuck.
- The vacuum cleaner itself is stuck due to any reason.
Solution:
There are three ways to resolve this error depending upon the cause that is leading to the error.
- Pick up the vacuum cleaner and rotate it upside down. Blow air using the vacuum cleaner to clean the wheels.
- Remove debris, stuck materials, hair, or any other thing that is stuck in the wheel, and push it down until the spring pushes the wheel out. Run the drive wheel back and forth until you feel no resistance by them and they are moving freely.
- Try changing the location of the Roomba vacuum cleaner to an even and clear surface.
Replacement:
If none of the solution work for you, you may need to repair the following part:
- Wheel motor assembly
Roomba vacuum cleaner 2 BEEPS, ERROR 2
Cause:
This error occurs only if the side or main brushes of the Roomba vacuum cleaner are not working. This could be done mostly because of something stuck in them or they are stuck in some furniture or appliance.
Solution:
There are quite a few things you can do to resolve this error:
- Look through the cleaner’s brushes thoroughly and remove all dust, debris, or waste material stuck in them.
- Analyze to make sure that brushes are installed properly in their intended position.
- Remove dust and debris from the bearings and the brushes. Also, clean the coverings and casing that are protecting the vacuum brushes.
Replacement:
If none of the solution work for you, you may need the following replacement:
- Brush motor
Roomba vacuum cleaner 5 BEEPS, ERROR 5
Cause:
This error is only caused when one of the Roomba vacuum cleaner’s wheels is stuck by itself or in something. This can happen due to extreme build-up of debris or if something is wrapped around the side wheel.
Solution:
This error can easily be resolved by following three simple steps.
- Remove dust, debris, or something that is stuck or wrapped around the side wheel.
- Push the wheel inside with gentle force and wait for the spring to push it out.
- Run wheels in both directions with your hand until they start moving freely.
Replacement:
If none of the solution work for you, you may need the following replacement:
- Wheel motor assembly
Roomba vacuum cleaner 6 BEEPS, ERROR 6
Cause:
This error only occurs if the cliff sensors of the Roomba vacuum cleaner are dirty and there is dust build-up.
Solution:
Two ways can become a solution to this error.
- Take a clean, soft cloth and wipe off all the dust and debris built on the vacuum cleaner’s cliff sensors.
- Try changing the location of the robot especially if it was stuck over a cliff or related area.
Replacement:
If none of the solution work for you, you may need the following replacement:
- Cliff sensors
Roomba vacuum cleaner 7 BEEPS, ERROR 7
Cause:
This error is reported by the Roomba vacuum cleaner if one of its drive wheels is stuck. This thing mostly happens due to too much debris building up or something wrapped around the wheel such as a candy wrapper, hair, etc.
Solution:
Clean dust and debris from the cleaner’s wheel while pushing it inside and waiting for the spring to push it out. Run wheels in both directions to see if there is some resistance. Do this until the wheels start rotating freely and smoothly.
Replacement:
If none of the solution work for you, you may need the following replacement:
- Wheel motor assembly
Roomba vacuum cleaner 8 BEEPS
Cause:
There are two possible causes of this error:
- The Roomba vacuum cleaner is stuck due to any reason, mostly because of an obstacle or unlevel surface.
- The front wheel of the vacuum cleaner is not working.
Solution:
There are two authentic ways to resolve this error depending upon the cause.
- Change the location of the vacuum cleaner and place it in a place that is even and clear of any obstacles.
- Analyze the front caster wheel of the vacuum cleaner and remove all dust, debris, hair, or any other thing stuck in it.
Replacement:
If none of the solution work for you, you may need the following replacement:
- Front caster wheel
Roomba vacuum cleaner 9 BEEPS, ERROR 9
Cause:
This error only occurs if the front bumper of the Roomba vacuum cleaner is jammed or the bumper sensors are not working properly. This can happen if there is too much dirt build-up or the sensors are covered with dust that they are unable to detect efficiently.
Solution:
There are two solutions for this error but in a nutshell, all you need is to do the cleaning.
- Wipe off the dust from the bumper sensors using a soft cloth or tissue.
- Brisky taps the front bumper of the Roomba vacuum cleaner until no dirt is coming out of the bumper. You can do this by moving the front bumper in and out until it’s free and smooth.
Replacement:
If none of the solution work for you, you may need the following replacement:
- Roomba’s IR bumper sensors
Roomba vacuum cleaner 9 BEEPS, ERROR 10
Cause:
Two possible causes:
- Roomba vacuum cleaner sensors are unable to detect a single obstacle in the whole cleaning area.
- The side wheel of the Roomba vacuum cleaner is stuck due to any reason.
Solution:
There are different solutions for the different causes of the error.
- Make some virtual wall or any obstacle so that the vacuum cleaner can assume that it is cleaning a small area.
- Clean side wheels while pushing in and out and rotating all around until it starts moving freely and smoothly.
Replacement:
If none of the solution work for you, you may need the following replacement:
- Wheel motor assembly
Roomba vacuum cleaner 11 BEEPS
Cause:
The only cause of 11 beeps error is that the Roomba vacuum cleaner hasn’t registered an obstacle in the cleaning area. This usually happens when the cleaner is operating in a relatively large room.
Solution:
There are two possible solutions to this problem.
- Pick up the Roomba vacuum cleaner and place it in a room with a small cleaning area.
- Install one virtual wall or add some obstacles in the cleaning area so that the vacuum cleaner can assume that it is operating in a small room.
Roomba vacuum cleaner 12 BEEPS
Cause:
The 12 beeps error is versatile as it can be caused due to multiple reasons.
- The cliff sensors of the Roomba vacuum cleaner are broken, dirty, or have stopped working.
- The battery is critically down and needs to be recharged.
- One or some of the side drive wheels are stuck mostly because of dirt build-up or something wrapped around it such as a hair or candy wrap.
- The main brushes of the Roomba vacuum cleaner are stuck or not working because of debris build-up.
Solution:
There are different solutions to this error depending upon varying causes.
- Take a clean cloth and wipe off the dirt from the cliff sensors. You may use a tissue as well.
- Put your Roomba vacuum cleaner on a home base or plug in the charging cord to fully charge the battery.
- Clean the side wheels of the cleaner while pushing them inside until the spring pushes it back out. Run wheels back and forth using your hands until there is no resistance.
- Remove dust and debris from the main brushes and clean the bearings. Also, ensure that brushes are installed at the right position and properly inserted into the machine.
Roomba vacuum cleaner 500 series charging error codes
Roomba vacuum cleaner 1 BLINK, CHARGING ERROR ONE
Cause:
This error is a clear indication that the battery is not connected or properly installed in the Roomba vacuum cleaner.
Solution:
Take out the battery from the system and reinstall the robot. Make sure that the pull tab is removed from the battery and that it is perfectly attached to its intended position.
Roomba vacuum cleaner 2 BLINKS, CHARGING ERROR TWO
Cause:
This error occurs if the Roomba battery is too hot and it is not safe to charge it in this situation.
Solution:
Let the Roomba vacuum cleaner stay still for about an hour until it cools down completely. Place the vacuum cleaner in a cool area especially while it is on charge.
Roomba vacuum cleaner 3 BLINKS, CHARGING ERROR THREE
Cause:
This error comes on the cleaner when it is unable to charge the battery due to some software or technical issue.
Solution:
Simply open the application, go to the settings, and reset the Roomba vacuum cleaner. After the reset process has been completed, put the vacuum cleaner back on charging.
Roomba vacuum cleaner 5 BLINKS, CHARGING ERROR FIVE
Cause:
This happened due to any kind of charging issues in the Roomba vacuum cleaner.
Solution:
Just reset the cleaner to its factory settings from the application. The reset will complete once the CLEAN light has turned to green color.
Roomba vacuum cleaner 6 BLINKS, CHARGING ERROR SIX
Cause:
Too hot Roomba vacuum cleaner is the only cause of this error.
Solution:
Firstly, let your cleaner rest for about an hour. Charge your Roomba vacuum cleaner in a cool atmosphere such as a room with an ON air conditioner.
Roomba vacuum cleaner 7 BLINKS, CHARGING ERROR SEVEN
Cause:
This error occurs when the battery is overheated and not cooling down anytime soon.
Solution:
Let the Roomba vacuum cleaner rest for an hour and then place it in a cool environment until the battery and the robot are cooled down properly.
There are two solutions to resolve this error.
- Try changing the location of the Roomba vacuum cleaner while placing it in an even and clear place. You may also press the CLEAN button so that the new cycle can restart.
- Remove dust and debris sticking in or around the side wheels. Run the wheels back and forth until no dirt is coming out and they are moving freely.
Roomba vacuum cleaner 400 series error code
Roomba vacuum cleaner No BEEP after the “uh-oh” sound
Cause:
This error occurs if one of the Roomba wheels isn’t touching the ground or is stuck due to something wrapper in its bearing.
Solution:
- Clean the wheels of the robot to remove dust, dirt, debris, hair, string, or any other thing stuck in them.
- Try changing the location of the robot while placing it on an even surface.
Roomba vacuum cleaner 1 BEEP after “uh-oh” sound
Cause:
This error only occurs when the main brushes of the vacuum cleaner stopped working or are not turning. This happens if something is stuck in the brushes or they are stuck in some furniture or appliance.
Solution:
There is one simple solution to these errors which mainly involves cleaning the brushes.
- Remove the covers of the brush by pressing the two yellow tabs down below. Clean the brushes to remove debris and dirt build-up and take out the object if it is stuck in the brushes. Put the brush guard back on and restart the cleaning cycle.
Roomba vacuum cleaner 2 BEEPS after the “uh-oh” sound
Cause:
The only reason behind the Roomba vacuum cleaner facing this error is that one or all of its side brushes are not turning. This usually happens due to dirt build-up or if something is stuck in them.
Solution:
There are two ways to resolve this error. Start by applying the first solution and if it doesn’t help, then move on to implementing the second way.
- Turn the Roomba vacuum cleaner upside down and thoroughly analyze whether something is stuck in the brushes. If there is any obstruction, remove it.
- Remove the two screws and take out the side brush. Check for things like string or hair wrapped around brush bearing. Remove it, put back the brush and screws. Restart the cycle.
Roomba vacuum cleaner 3 BEEPS after the “uh-oh” sound
Cause:
This error occurs when the dustbin of the Roomba vacuum cleaner is full and robot cannot move or clean the area.
Solution:
There are simple solutions to this error.
- Take out the dustbin from the vacuum cleaner and empty it while removing all the dust. Clean the dustbin and reinsert it. Make sure it is placed in the right and intended position.
Roomba vacuum cleaner 4 BEEPS after “uh-oh” sound
Cause:
As soon as you hear 4 beeps after the “uh-oh” sound, you should know that one or some of the wheels of the Roomba vacuum cleaner is unable to move at all. This happens if something is stuck or wrapped around the wheel.
Solution:
There are two ways to tackle this kind of error.
- Change the location of the Roomba vacuum cleaner and place it on a level and clear surface without any obstructions.
- Remove dirt and debris from vacuum cleaner wheels. Look if something is wrapped around or stuck in the wheels. Push them in and out several times and rotate them in both directions. Do this until the wheels start moving smoothly.
Roomba vacuum cleaner 5 BEEPS after “uh-oh” sound
Cause:
This error is reported by the Roomba vacuum cleaner when the cliff sensors are not working. This happens when a lot of dirt build-up on sensors and they are unable to detect efficiently.
Solution:
The go-to solution to resolve this error is cleaning.
- Take a look at the front bumper and remove dust from the cliff sensors. You can use a clean cloth for cleaning or just blow compressed air on the cliff sensors or may use a vacuum as well.
Roomba vacuum cleaner 6 BEEPS after the “uh-oh” sound
Cause:
The 6 beeps error can be caused due to two major reasons.
- The wheel of the Roomba vacuum cleaner is facing some obstruction.
- The vacuum cleaner is trying to move over a large obstacle while moving forward for cleaning purposes.
Solution:
Just like causes, there are two possible ways to resolve this issue depending upon its causes.
- Pick up the Roomba vacuum cleaner and move it upside down. Look for obstruction or something that is causing the wheels to hang out. Remove that obstruction and move wheels in and out to ensure that they are now seated perfectly into the cleaner’s body.
- Check the cleaning area to remove all obstacles that Roomba vacuum cleaners can drive over. Removing them will ensure that the robot has an even surface and it will not be stuck or the wheels will not hang out while cleaning.
Roomba vacuum cleaner 9 BEEPS after the “uh-oh” sound
Cause:
The only reason that this error is being reported by the Roomba vacuum cleaner is some fault or issue in the sensors.
Solution:
Contacting the iRobot Customer Support Service is the only solution to this issue. They will guide you step-by-step to resolve this error or will visit your house to get things done. You can reach out to them through their official website www.irobot.com/support.
Roomba vacuum cleaner 10 BEEPS after “uh-oh” sound
Cause:
This error is reported by the Roomba vacuum cleaner being stuck due to some obstacle or uneven surface.
Solution:
There are two things you can do to resolve this error.
- Try changing the location of the robot and let it work in a place that is even and there are no obstacles.
- Install some virtual wall around the obstacle that causes the Roomba vacuum cleaner to stop. This will prevent robot from driving over obstacles or going into places that are not even.

“Your home is a representation of yourself, and it should only be filled with clean items that you enjoy and use”
Professional cleaning expert


![Will rubbing alcohol ruin furniture [Truth Exposed]](https://www.sanitisationsingapore.com/wp-content/uploads/2021/09/Will-rubbing-alcohol-ruin-furniture-426x208.webp)